Have you ever wanted a place to throw your food scraps and start building your own compost, but live in a place where you can’t have a classic compost pile and do not want to spend a lot of money on a commercialized compost bin? With a few small ingredients, a couple of dollars, and some DIY time, you can begin the journey of building your own miniature compost bin and prevent additional unnecessary organic waste from reaching a trash mound.
While visiting friends who live in a small rental house and can not build a proper compost pile in the backyard, I watched as they were beginning the process of constructing small compost bins. It blew my mind. Composting is beneficial on so many levels and, even if the end result is not to mix your creation into your garden, it is a good way to keep additional waste from reaching a garbage facility. At many facilities, all different types of trash are dumped together. This causes food-waste decomposition to inevitably be delayed and adds to the increasingly severe disposal problem we are currently facing.
Understanding the fundamentals of managing compost is simple and disproves several initial misconceptions and concerns many people have. Generally there are complaints about the smell and bugs which tend to come along with compost. This is especially true if ones living situation does not offer much backyard or porch space. However, if done properly, compost should not smell and this small compost bin will assist in reducing the overwhelming amount of flying insects. Remember that many of the critters are important in the aid of decomposition, as our scraps are their food.
Getting Started:
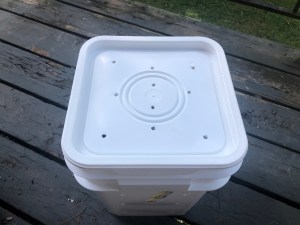
The first item you will need is a standard five gallon bucket (about $5 at a hardware store) or something equivalent. In the pictures below the bucket used was four gallons and originally had hardboiled eggs inside. It was repurposed and received for free from a local restaurant (after they used the contents). The second item needed is a drill. Drilling holes for aeration and drainage will allow gases to move in and out of the bucket, accelerating the decomposition of your food scraps and other organic contents. The last item is free and needs to be scavenged to find, some sticks or small pine branches to place at the bottom of the bucket to assist in providing drainage.
Below is a step-by-step guide with pictures. (Note: It is important to have more holes for more aeration and drainage. Having too many holes is less of a problem than too few. The bucket shown below is square, so if using a standard cycle bucket, use your own judgement when drilling.)
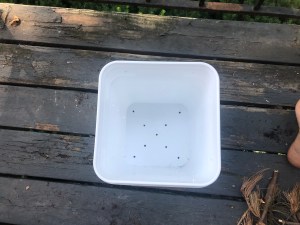
First: Flip the bucket upside-down so the base is in the air and drill 9-15 holes in the base.
Second: Decide on making four or five rows around the sides of the bucket (use a permanent marker if needed before beginning). Each row should be spaced 2-3 inches above the previous row.
Third: Place the lid on the bucket and drill a similar amount of holes through the lid.
**At this point the hardest part should be complete.
Fourth: Once the bucket is complete, gather your sticks and twigs. Begin by placing them in a semi-organized, grid-like fashion at the bottom of the bucket. Once this is complete you can begin placing your food scraps inside.

Fifth: Whenever placing food scraps inside the compost bin, you will need to have a small amount of dirt or earth to place on top. This is the key in aiding the decomposition process and providing space between the food scraps for aeration. This, in addition to keeping the lid on the bucket, will deter large amounts bugs and flies while also reducing the smell, if there is any at all.

Sixth: This might have needed to be the first step, but find a place where the compost bucket is outside and out of the way. Placing it next to the door is fine as there should not be many bugs around it nor much of a smell coming from it.
**Two key points to remember about your compost bin: (1) Drainage and aeration are key in allowing the food scraps to decompose and providing the compost enough gas exchange to remain healthy and function properly. (2) Placing a small amount of dirt, soil, or brown material on top of new food scraps each time more is added to the bucket will assist in keeping bugs inside and not flying on top.

One Comment Add yours